

American Hurling Trailer Build Log (Part 3 of 4)

Welcome back! So now we've added removable hurley display/storage racks and a bench to toil over some repairs and banding work on. If you're just now joining us, here is what those look like:


The next big, important, space occupying build was a place for our pop-up canopy and our fold-up tables. This was a daunting build for a few reasons, primarily that having these readily available no matter how packed full of gear the trailer is will be vital in our setup process on early tournament mornings. Additionally, these are some large items that take up a lot of space and getting this wrong conceptually could cause some of our subsequent builds to be problems as well. So we mulled this one over for quite a while before my dad sent me this sketch:

Not the most elegant drawing, but the idea was enough for me to run with. Conceptually, the back doors of the trailer serve as the back of the "bins" for the tent and tables so that when the doors are closed they're locked in place. When the doors are opened, they're always readily available because there's very little space to pack anything in behind them. Seems to work perfectly! Another useful observation was that the staggered heights of these two structures makes a perfect spot for front access storage of other items. In this case, these two bins are nearly an identical depth as a dozen sliotars. Coincidence? Yes, but a welcome one.
So I took all of this ideating and created another 3D model to visualize the build:

Looks like at least 8 dozen sliotars per tower. We weren't sure exactly how to utilize the space behind the canopy tent bin, so for now we decided to leave it empty. More on that later; on with this build for now.

The table pictured is smaller than the ones this bin was sized for, but the proof-of-concept seems to be a success! As mentioned in Part 2, this trailer build is fueled by pocket hole joinery and flush trim routing; quick and dirty during construction (literally...I think I'm still picking sawdust out of my hair) but strong and relatively clean once completed. I realized at this point that the 2 x 4 cross beams weren't exactly necessary because the 3/4" plywood was plenty strong. Decided not to rebuild it here, but I did adjust this spec on the lower bin.
Now for the sliotar towers:

Looks pretty good to me! And it holds 10/11 dozen per tower, which is even better than expected. Now all that's left is to repeat this process on the lower bin for the canopy tent and replicate the sliotar tower a few more times.

And just like that everything is starting to take shape! The new tables and canopy tent are fitting in snug. Just one more sliotar tower to go (for now):

And a night shot of the last sliotar tower going in. You can't say we haven't put in the hours on this build! Shoutout to the random street light in my backyard that serves as an excellent work light on nights that it decides to turn on. Real MVP.

And here's the reverse view where you can see the awkward void space behind the canopy tent bin. We'll address this and get it sorted in the next build. Guest appearances by some used home air filters and Dublin the dog in this pic.
It was at this point in the build that we realized that the hurley wall rack looks really cool, but it isn't the most usable storage method for hurls. We'd put some miles on the trailer at this point and, somewhat inexplicably, no matter how tight we clamped the hurls into the rack a few of them will still find a way to fall out; and once one falls and loosens the clamp you can cue the Tom Petty because it's a Free Fall for the rest of them! On top of that, it's not super easy to look through the hanging hurls and pick one out/remove it from the rack. So we decided we needed an additional storage type where we used shelves and let gravity do the work of keeping the sticks in place. We also wanted a better place to store kids hurls because the removable racks are too tall for them and it seemed like utilizing this void of space behind the canopy was the place for this build to come to life.
This one went in reverse order. I was the one to create the super crude sketch and my dad was the one who got to execute the build.

Just when you thought dad's sketch was rough, we can go rougher! The top is a section view of the supports and the plywood shelves (that scribble at the top is indicating a 10 degree downward angle on the shelves), and the bottom is a plan view of the front of the shelves. Bottom right is intended to be more sliotar towers on the lower canopy tent bin flush with the front of these hurley shelves. The left side would be floor to ceiling shelves to utilize the awkward space we were discussing above.
My dad is better at building without the crutch of a 3D model, so he dove straight into this one.

This photo jumps ahead a few steps, but it's the only one that shows the first step in this build, which was to add more sliotar towers. We added two more on both levels (extending the upper level backwards above the table "bin" in the process) to better utilize the space. The above photo is taken more-or-less from the side door of the trailer, so we wanted the hurls to be readily accessible as soon as you step in the door which meant moving them further towards the front. This recess under the towers gave us some full-depth hurley shelves on the bottom with some youth storage on the top.

Back to the first step of this build though. I thought we'd use little angled blocks as the shelf supports, but Tom opted for some longer strips of plywood. He also had to make some cuts in the other trim and support pieces we've installed along the way, but it'll all be mostly hidden when it's all said and done. Now for the hard part; mirroring these shelf supports over to the other side so that the shelves sit square.

Pretty clean! I'm sure there was a decent amount of trial and error involved but it all worked out in the end. The original plan of adding 2 more sliotar towers to the bottom row (making them flush with the back of the pop-up canopy bin) was nixed when we added more to the top row, so instead of having shelves with variable width, dad opted to run the middle support run all the way up to the top of the shelving.

Fitting the first shelf. These first two were sized for goalkeeper hurls, but the concept is the same. The shelves are cut a little short of the back wall to allow the bas of the hurl to sit below the shelf level. This provides a bit of a positive "lock" to hold the hurls in place during transit. Now to repeat that process 6 more times:

And just like that it's halfway done! Looks pretty good all said and done so props to dad for the build. But of course there's still another set to go on the right side, so time to repeat the process all over again.

All of these shelves will be "youth depth" because of the addition of the sliotar towers. More trial and error to get the shelf supports in, followed by some shelf fitting and some hurley stacking and you get:
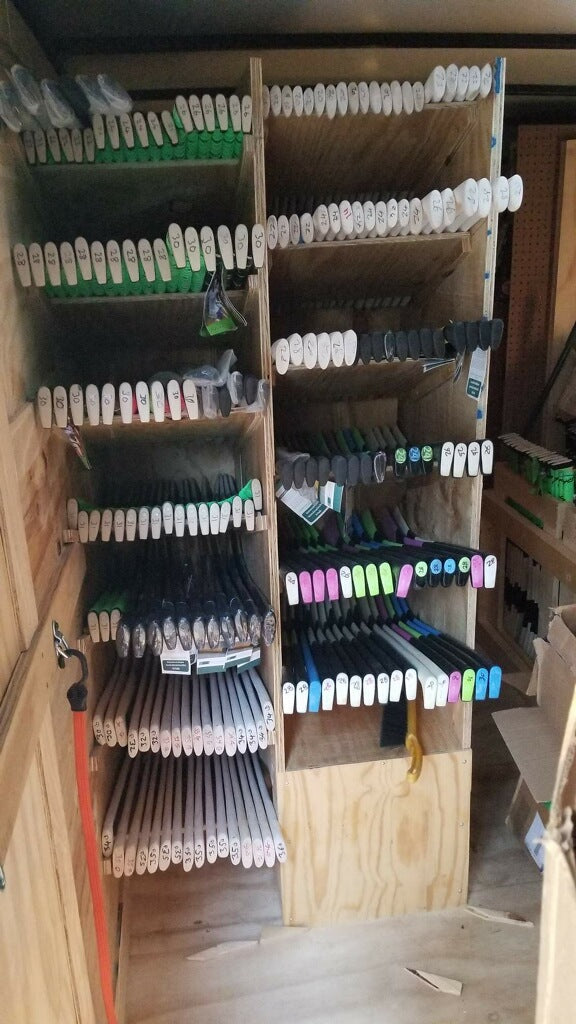
The finished product! That's another 230-240 hurls when they're placed in there nicely (more like 350ish when you just pack as many in there as possible for the biggest events) which is a great addition to the build-out.
So that wraps up Part 3 of the build log! The next part will be the big final where we reveal the exterior work we've been planning all along, so stay tuned next week when we drop that just before heading up to Chicago for the USGAA Finals. Maybe we'll see you on the road to Chi City!?
Leave a comment